Punjabi Samosa
- Rashmi Gharat
- Jul 29, 2021
- 9 min read
Updated: Apr 18, 2024

Your ultimate guide for making Perfect Punjabi Samosas each time.
Samosas are one of the most loved savoury snacks, not just in India, but all around the world! They are one of the best snacks that stand majestically tall, just like a king, on shelves of each and every mithai/sweet shop in India. And, after seeing them, can one resist the temptation of having a garma garam (hot) Samosa??
Jump to:
Punjabi Samosas are perfect as a snack during tea time or as a starter for any parties. They have a crispy crust on the outside and delicious, spicy potato filling inside. And making traditional Punjabi Samosas at home is not that hard. By following the step-by-step instructions and precise measurements along with tips and tricks and guidelines in this post and video below, you will be able to make the exact shape and perfect Punjabi Samosas, without bubbles, at home, just like the ones you get on streets in India.
Quick, easy to follow video with step-by-step instructions of how to make Punjabi Samosa:
Roasting and pounding
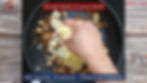
To make your samosas as flavourful as outside ones, you need to roast cumin, coriander and fennel seeds on low heat. Take care not to burn them, as they tend to burn quickly. Also, pound them, only slightly, using a mortar and pestle.
If you try to take a short cut for this process by not roasting or by grinding the seeds in a grinder instead of pounding, you won’t get the right texture and flavour. Roasting will release the oils in the seeds, and pounding slightly will give right texture and make them even more flavourful.
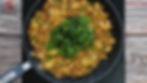
Delicious, spicy, aromatic filling
Filling inside a samosa is the heart and soul of samosa. No matter how good your crust is, if your filling isn’t up to the mark, Samosa won’t taste good!
To make your filling delicious, you need to mix a bunch of spices mentioned in the recipe below with boiled potatoes and peas. Adding cashew nuts and raisins make your samosas extra special when serving for parties, guests or festivals. Dry mango (amchur) powder makes it slightly tangy without making it moist. Cilantro (coriander) makes the filling even more flavoursome.

When adding boiled potatoes, to get the right texture, you must crush them in your hand instead of chopping, grating or mashing them. The slightly uneven pieces of potatoes that you bite into when having outside samosas is achieved by this technique only.
Remember to roast the filling slightly till it is dry, it shouldn’t have any kind of moisture, or else samosas will turn soggy after they are fried.
After the filling is ready, it is extremely important to let it cool down completely before proceeding to the next step. Hot/warm filling will make shaping samosas incredibly difficult.
Perfect dough for Perfect crust
If you want a perfect crust and a samosa that doesn’t have boils/bubbles on the outside, you need to first make a perfect dough.
Adding some salt and carom seeds (ajwain) to the flour will make the crust flavoursome. Remember to crush carom seeds in your palm with thumb of other hand before adding to flour, this will enhance its flavour and aroma.
Now the first step while making Samosa’s dough is to incorporate fat well with the flour (in this recipe I am using oil as fat; ghee is also used in some recipes). Initially mix oil and flour well with your fingers and then go ahead and use both your hand to rub this mixture well together. You will know if you have incorporated fat well into the flour when you press the mixture in your palm and it easily forms a ball (see video).
After this stage start adding little chilled water at a time and kneading the dough. Water needs to be chilled and you should only add little water at a time as you want a STIFF and TIGHT dough.
I can’t stress the importance of having a STIFF and TIGHT dough enough here! If you make a soft dough, it will be hard to shape samosas, but more importantly it will ruin its looks – excess moisture in the cover will cause bubbles to form on the crust!!
After the dough is ready, you should cover and allow it to rest for half an hour.
Getting the shape right – ALWAYS
To make a perfect Punjabi Samosa, that sits tall and straight on a plate without being wobbly, follow the process mentioned below and the process shown in the video.
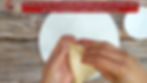
Start by making an oblong puri of a dough ball. You need to make a thin puri or else crust will become really thick after frying and will be unpleasant to eat. Cut puri into 2 equal parts, so that each part will have a straight side and a curved side. Apply water to straight edge and bring its corners together to form a conical shape. Now press and seal the tip and joint well. This part is important, seal it really well to avoid samosas from opening up while frying.
Rest this cone between your index finger and thumb, and always make sure that the sealed joint is on the thumb. Now fill the potato mixture, that has completely cooled down, in this cone and press gently to avoid any air pockets.
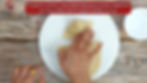
Then apply water on the circular edge and make a small fold on the part resting on your index finger. Now bring the folded part towards thumb and stick both ends together. The fold at the bottom of Punjabi samosa is important, it is what gives samosa a proper shape and helps it sit properly on the base.
Now place the samosa on rolling board. This will ensure that it sits properly and gets the right shape before frying. Finally, properly press and seal the joint ends together to avoid them from opening while frying.
And now your samosa with perfect shape is ready!
Slow and steady with frying
Before starting the frying process, make sure the oil is medium hot. If the oil is not hot enough, the samosa will soak up lot of oil and will become greasy. On the other hand, if oil is too hot, Samosa’s outer crust will become brown quickly leaving the inside crust raw and unpleasant to eat. Also, too hot oil will cause boils/bubbles on outer crust.
After oil becomes medium hot, lower the heat. Samosas must be fried slowly on LOW HEAT ONLY if you want a proper crust with golden brown colour and without any bubbles. After you add samosas to oil, DO NOT touch them. Let them get fried a bit, rise up and start floating. Only then turn them over and fry till golden brown on LOW HEAT.

Even after following all the above procedure, if your samosas get bubbles on the crust, then after you shape your samosas let them rest for 15-20 mins before frying. This will allow any moisture on the surface of the cover to dry off before frying, thus reducing the amount of bubbles.
Now you can enjoy your fruits of labour; hot, delicious, spicy Punjabi Samosas.
Yes, I know, you must be wondering, this all seems a lot of work for a samosa, I might as well get one from the mithai shop instead. That’s true, I feel the same sometimes. It will be quicker to buy one from a shop down the road, but believe me when you make it yourself, you can’t avoid being proud of yourself, especially when you get the right shape!!
Also, sometimes you are just in the mood for cooking or have some spare time that you want to use fruitfully. When you make Punjabi Samosa and see your creation standing tall on your plate, you won’t be disappointed……It is definitely time well spent!
Here are other OvalShelf’s Drinks and Veg recipes. Some Snack recipes that you will really love are Maharashtrian Dadpe Pohe, Tomato Omelette (Veg) and Oats and Cranberry Cookies.
Check out OvalShelf’s collection of Desserts and Sweets.
Frequently Asked Questions:
• Samosas have boils/bubbles all over on crust…
Dough for the cover was soft and contained too much moisture. Knead a stiff and tight dough. Also, this can happen if you are frying on high heat – always fry samosas slowly on low heat.
Even after following above guidelines if samosas get bubbles on frying then after shaping the samosas leave them for drying for 15-20 mins without covering them so that any excess moisture in the cover evaporates before frying.
• Samosas open up while frying….
Joints and tip were not sealed properly. Use some water while sealing the samosa.
After adding samosas to oil, do not touch them for a while. Let them get fried a bit. Flip them after they rise to top and start floating.
• Outer crust of samosas is nice, crisp, without any bubbles, but inner crust is raw, uncooked and tastes unpleasant….
Oil was too hot when frying hence outer layer quickly turned brown, but inner layer didn’t get a chance to cook. First let the oil heat to medium hot, then lower the heat and add samosas and then fry them slowly on low heat only.
• Samosas don’t hold their shape…
Dough for cover was too soft. Knead a stiff and tight dough so that samosa can hold its shape.
Also, make sure filling has cooled down completely before shaping the samosas.
• Samosas are nice and crisp without any bubbles after frying, but 10-15 mins later start becoming soggy…
Cover of samosa was perfect, but inner filling had moisture. When preparing the filling, roast it well making sure there is no form of moisture left in the filling.
• Samosas are just too greasy…
Oil was not hot enough/cold before adding the samosas hence samosas soaked up a lot of oil. Make sure oil is medium hot before adding samosas. Then lower the heat and then add samosas and fry them on low heat.
This can also happen if enough fat is not added to the flour or fat is not incorporated well in the flour before kneading the dough.
• Top of samosa is good but bottom of samosa has many boils/bubbles ….
While sealing the bottom of samosas too much water was used, so bottom of samosas have more moisture compared to the top and hence bubbles at the bottom. Use water only as needed. Leave samosas to dry without covering them for 15-20 mins before frying. This will help some of the water to evaporate and dry out.
• Samosas outer cover is just too hard and not crispy/crunchy ….
Either fat was not added to the flour or not enough fat was added to the flour. Also, if fat is not well incorporated with the flour this can happen. Make sure fat is well incorporated with flour before kneading.
Some trending OvalShelf recipes:
Recipe Card
Latest OvalShelf recipes:
Step-by-step instructions with photos:

1. Roast cumin seeds, coriander seeds and fennel seeds on low setting until golden and aromatic. Take care not to burn.

2. Pound this slightly in a mortar and pestle and keep aside.

3. Heat 1 TBSP oil in a pan on medium setting and add asafoetida, ginger, green chillies, pounded spice mix, cashew nuts, raisins and mix well.
4. Now add potatoes by crushing them in your hand.
5. Then add green peas, turmeric, red chilli powder, black pepper powder, cumin powder, coriander powder, dry mango powder, garam masala, 1½ tsp salt, cilantro and mix well. Keep aside and let it cool down completely.

6. In a bowl add plain flour and ⅓ tsp salt. Crush carom seeds in your palm with thumb of other hand and add to the bowl along with 3 TBSP Oil.

7. Properly combine oil and flour with your fingers. Then rub the mixture well using both your hands till oil is well incorporated in the flour.

8. It should easily form a ball when pressed in your palm.

9. Now knead a STIFF dough using chilled water, little at a time. It’s important for the dough to be STIFF and TIGHT and not soft. Cover and let it rest for half an hour.

10. After half an hour make 4 equal sized balls.

11. Roll a THIN, oblong puri with one of the balls.

12. Cut it into 2 equal parts.
13. Lift one part in your hand, apply water to the straight edge and bring corners together and stick so that it forms a conical shape. Pinch the tip and press and seal the joint really well so that it doesn’t open whilst frying.

14. Now rest this cone between your index finger and thumb, making sure the sealed joint is on the thumb.

15. Now fill completely cooled potato mixture inside the cone, little at a time, and press gently to avoid any air pockets.

16. Then apply water on the circular edge and make a small fold on the part resting on your index finger.

17. Now bring the part resting on index finger towards thumb and stick both ends together.
18. Then place the samosa on rolling board; it should sit properly on the board. Now properly press and seal the joint ends together so that they don’t open while frying. The fold at the bottom of Punjabi samosa gives it a proper shape and helps it sit properly on the base.

19. Make rest of the samosas in this manner.

20. For frying first heat the oil to medium hot and then lower the heat setting.

21. Now add samosas to medium hot oil.

22. Do not touch them till they get fried a bit and start floating.

23. Then flip them over and fry on low heat till golden brown.

24. Serve hot.
♥ We LOVE hearing from you ♥
If you have tried this recipe, please do share your food photo with us. Mention @ovalshelf or use hashtag #ovalshelf on Facebook, Instagram or Twitter. Thank you.
Subscribe to our YouTube Channel

Click here to Subscribe to OvalShelf's YouTube Channel to get all our quick, precise and simple video recipes. YouTube subscription is FREE.